|
|
|
|
|
|
|
|
|
|
|
This page lists David Hendley's published articles, followed by several
short essays and articles about different aspects of making pottery and life as a potter.
|
Publications: "Around the Firebox" Columns, Clay Times magazine:
"Embracing Failure" Spring/Summer 2016 "No Regrets" Winter/Spring 2015 Spring 2014 "The Cobalt Blues" Winter/Spring 2013 "Burning Up and Burning Out" Spring 2012 "Pottery Heroes" Summer 2011 "Take Pains and Pleasures in Constantly Copying" Winter 2010/11 "Using What You Have Left" Summer 2010 "Falling Down and Letting Go" January/February 2010 "High School Reunion" September/October 2009 "Effortless Custody of Automatism" May/June 2009 "Fingerprints That Never Disappear" November/December 2008 "One Word: Plastics" July/August 2008 "Feel the Burn" March/April 2008 "A Tiny Studio and a Tall Extruder" November/December 2007 "The Inconvenient Truth for Potters" July/August 2007 "Never Say Never" March/April 2007 "Dancing About Architecture" November/December 2006 "Do it! and the Money Will Come" July/August 2006 "Rich in Community of Friends" (with Dirje Smith) March/April 2006 "Burn This Magazine" November/December 2005 "Hammer Time" July/August 2005 "Working in Bed" March/April 2005 "Living on Potters' Time" November/December 2004 "The Universal Language of Clay" (with Tony Clennell) September/October 2004 "Easy Money" July/August 2004 "What's New Pussycat?" (with Tony Clennell) March/April 2004 "Time and Place" (with Tony Clennell) January/February 2004 "Accessories Make the Outfit" September/October 2003 "The Accidental Potter" July/August 2003 "Reality Check" May/June 2003 "Potters and Music, and the Ravi Shankar Factor" March/April 2003 "Marry Well" January/February 2003. "Work Only Half a Day" November/December 2002 "A Legacy of Clay" September/October 2002
"The Last Canisters You'll Ever Need", Pottery Making Illustrated, Jan/Feb 2012, pages 12-14.
"Half and Half", Pottery Making Illustrated, May/June 2010, pages 35-38. |
"Coping with Metal",
Pottery Making Illustrated,
July/August 2008, page 12. "Are You Sure That Was Extruded?", Pottery Making Illustrated, July/August 2008, pages 24-28. "M.F.A.s in a M.B.A. World", The 2007 NCECA Journal (National Council of Education for the Ceramics Arts), Volume 28, pages 71–72. "Wood Fired Doesn't Mean Brown", Ceramics Monthly, May 2004, pages 38-43. “The ‘Three E’s’ of Making Tools”, The 2000 NCECA Journal, Volume 21, pages 105–107. (Reprinted below.)
“Casting a Chimney”,
Ceramics Monthly, February 2001, pages 102-104.
“Mining with the Potter in
Mind”, Ceramics Monthly, October 2000,
pages 100, 101. “ ‘Handmade’ Still Means ‘Hand’ Made”, Ceramics Monthly, April 2000, pages 118, 120. (Reprinted below.) “Buck Pottery, 17 Years of Turnin’ and Burnin’ ”, Ceramics Monthly, March 2000, pages 62-66. “Simply Red”, Ceramics Monthly, October 1999, pages 66-69. “Making a Bumper-Jack Extruder”, Pottery Making Illustrated, Winter 1999, pages 30, 31. Also reprinted in Pottery Making Techniques, American Ceramics Society, 2004. “Homemade Dies”, Pottery Making Illustrated, Winter 1999, pages 32, 33. Also reprinted in Pottery Making Techniques, American Ceramics Society, 2004.
"Wood Moldings as Production
Tools", Ceramics Monthly, February 1980,
pages 67-69.
"Locking and Sealing Storage
Containers", Ceramics Monthly, February
1977, pages 60-63.
"Making a Bumper Jack Extruder",
Ceramics Monthly, September 1976, pages 50-53. “Production of Hand-thrown Ceramic Storage Containers Emphasizing the Aesthetic and Functional Aspects of Locking and Sealing”, Master's Thesis, Texas Woman's University, Denton, TX, 1976.
Making Pottery for the Home and Garden by Sumi von Dassow, American Ceramic Society, 2025. 21st Century Kilns, by Mel Jacobson & friends, www.21stCenturyKilns.com, 2010. Ceramic Extruding, by Tom and Jean Latka, Krause Publications, 2001. Extruded Ceramics, by Diana Pancioli, Lark Books, 2000. The Extruder Book by Daryl Baird, American Ceramic Society, 2000.
|
|
Ceramics Monthly and Pottery Making Illustrated magazines, and books published by the American Ceramic Society are available from the Society at their website https://ceramicartsnetwork.org/home. Clay Times magazine ceased publication in 2016. |
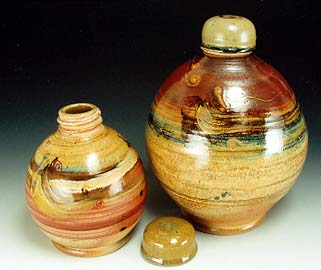
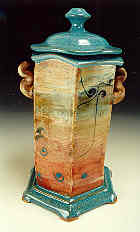
Everything Matters; an Artist's StatementEverything matters, every material, process, tool, and technique. In the pottery studio, every choice determines the look and feel of the finished work, and is an opportunity for the potter to incorporate his or her personality, or spirit, into the piece. For me, this means that, whenever possible and reasonable, I want to make my own tools, formulate my own materials, and cultivate my own techniques. My goal is to make pottery that is honest, expressive, and functional. To me, "functional" encompasses a wide range of attributes, including good design, durable, non-crazing, non-leaching glaze surfaces, and spouts and handles that work and are not overly fragile. "Functional" also means that the piece must be efficiently made, so it can be sold for a price that will not discourage its use. |
|
|
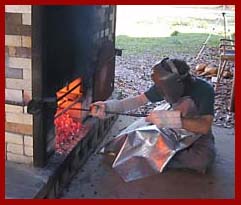
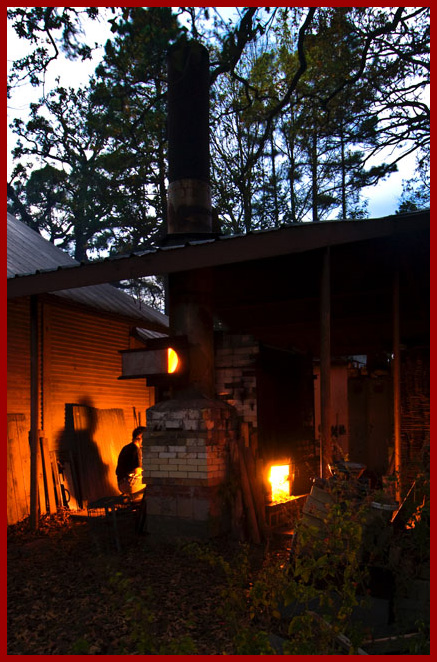
As a full-time potter, I have ample time to experiment with new ideas, but
must also produce enough reasonably priced ware to make a living. I don't view this as a
conflict: production can generate new ideas, just as ideas can spur production. All of my pottery is fired to 2400 degrees in a kiln that burns scrap wood from a local pallet-building factory. The kiln is my ultimate tool. In this age of computer-controlled kilns, this throwback to 19th century technology requires that I feed it and tend to it non-stop for nine hours. I can “read” the sound, escaping smoke, and glowing colors of the kiln, and this last step in production offers me one more opportunity to affect the outcome of the work. Philosophically, I love the notion that a beautiful, functional piece of art can be made of lowly, worthless clay, and finished with the by-products from a manufacturing process. I have no desire to make my business grow by hiring production assistants or sales marketers. I like doing all the myriad jobs required to make my art and run my business. On any given day, I may be mixing and preparing clay in the morning, designing pottery in the afternoon, and analyzing the molecular formulae of glazes on the computer in the evening. In any given month, I may be working in the shop during the week, teaching workshops or attending art fairs on the weekends, and writing articles in between. It’s all important. Everything matters. |
|
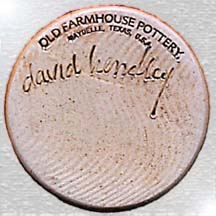
Pot Bottoms, Potter’s Marks, and Signatures If you have potters over for drinks, dinner, or just to show them your favorite pots, the first thing they will do is turn them over to look at the bottoms. On more than one occasion this has caused a mishap when the cup still had some coffee in it or the bowl still had the remnants of soup in it! A potter can tell a lot by looking at a bottom: craftsmanship, attention to detail, the maker’s personality, and, hopefully, who made it. |
|
Handmade pots are marked and identified in many ways, and many potters have strong opinions about how potters should mark their work. At one extreme is the “initial stamp” or “mark” only advocate. I don’t really understand this, since it means that only a handful of people will know who made the piece. Even an Internet search is useless, if all you have to go on is an initial or a non-alphabetic or non-pronounceable logo. The singer Prince was able to successfully switch his identity from his name to a symbol, but only because he was already widely known and recognized. I also don't understand the illegible signature, and many times I have been frustrated trying to read the bottom of a handmade pot. Often times, when trying to decipher a name I can't even tell which side is the top. While looking at pottery in people's homes I have asked them what the signature says, and many times, even though they bought the piece from the maker, they can't remember his or her name, and the scrawl on the bottom is no help. |
|
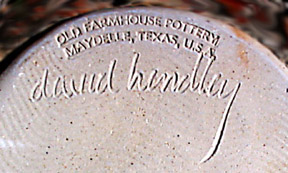
At the other extreme, I do think that a stamp that is thinly-veiled advertising cheapens the piece. I don't want to see a website address, e-mail address, mailing address, or phone number on the bottom of a well-made handmade pot. It reminds me too much of a paper towel dispenser in a restroom: “For reorders call 800-BUY-MORE”. I also think that for handmade pottery a stamp impressed into the clay is better than a rubber stamped ink message. It just looks more thought-out and permanent. For my work, I want to clearly identify who made the piece and where it was made. I think a handmade pot is deserving of a handwritten signature. So on the bottoms of my pots, you will see the name of my shop (Old Farmhouse Pottery) and my location (Maydelle, Texas, U.S.A.) impressed into the clay with a metal stamp, along with a legible hand written signature. Anyone who wants to find out more about me or my shop can easily find my Website by typing this information into a search engine. |
 |
I have been identifying my work this way since the '70's. I was influenced to use this identification system by John Glick, my favorite potter of the era, who marked his work with his shop name (Plum Tree Pottery) and signed each piece by hand. Stamping the name of a pottery shop and its location into the clay has a long history and tradition in American pottery. I love old jugs that have the name of the shop impressed right on the shoulder of the pot. |
| One other thing: any potters who might be reading this, please, before you send a pot out into the world, make sure the bottom is nice and smooth, so it won't scratch any table tops. All of my pottery is smoothed on a buffing wheel when unloaded from the kiln - the last step in the long process from clay to finished pottery. |
|
It All Comes
Down to the Fire
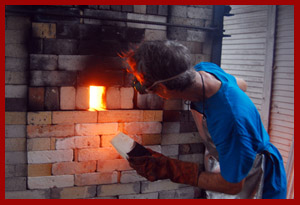
The
currently popular style of wood fired pottery that emphasizes raw clay surfaces, ash runs,
Shino glazes, and flashing is so pervasive that one seldom sees contemporary wood fired
pottery that embraces other traditions. Don’t get me wrong; I love and admire warm,
toasty fire-flashed and ash-enhanced clay surfaces. Otherwise, I certainly wouldn’t
have spent all the time and effort to build a wood fired kiln, collect the fuel, and then
spend hours stoking the fire, when it is so easy to turn on a gas spigot.
But there’s more to life
than shades of brown, and I also love glazes, color, and decorating pots. I like pots that
reveal themselves slowly to a thoughtful viewer or user, and, frankly, I don’t want
my pots to scream, “I am wood fired!” Over the past several years, firing in my
“Olsen Fastfire” style kiln, I’ve developed what, for me, is a good balance
of colorful and purposeful glaze and slip work with the rich and somewhat random and
unpredictable effects and enhancements of wood firing. On a practical level, a big kiln
requiring days-long firings was out of the question for a solitary potter wanting to make
a living at his craft, and my reasonably-sized kiln fires in less than ten hours. |
|
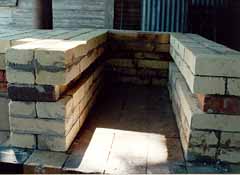
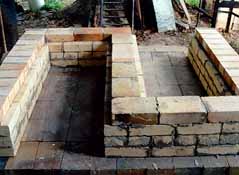
I had built a wood fired kiln in college in the 1970’s, but unlike most wood firers, I didn’t have a years-long yearning for my own wood fired kiln; I liked that wood fired look, but mostly it just suddenly seemed like the right and logical kind of kiln to build. Here I was, recently relocated from the city to my acreage in the piney woods of East Texas. I had more firewood than I could ever use, just from cutting down dead trees on the property, and there were several sawmills within a few miles of my house. I heated my house, the pottery shop, and even my water with wood. I started a fire almost every day, and it made no sense to install a gas tank and start buying gas just because I wanted to build and fire a kiln. I’m now on my second “Fastfire” style kiln, and have made many modifications to the original design.
For
my first efforts with my wood-fired kiln, I simply used any leftover glazes from my studio
with the gas kiln in the city, and glazed the pots all over, as I was used to doing. I
immediately saw a difference in the glazes; the colors were deeper, the visual textures
were richer. It wasn’t until several firings later that I started enjoying and
looking forward to the fact that the wood firing also enhanced any small, unglazed areas
of clay, such as the foot rings of bowls. With each firing, I started leaving larger areas
of the pieces unglazed, to take advantage of the flashings and ashes from the flames
circulating throughout in the kiln. Soon, I started developing glazes, slips, and
techniques specifically to take advantage of the effects of the wood firing, and I now use
formulations designed specifically for my kiln and my firings. This is my marriage of the
purposeful and planned color and decoration of modern gas-fired stoneware with the subtle
and variable effects of wood firing.
|
 |
It All Comes Down to the Fire
The clay has been shaped, the form has been set, the abstract idea now a thought manifest. But the potter can’t rest until it passes the test. Will it be cursed or will it be blessed? After hours of work, it comes down to the wire. As the flames lick the clay, you can see it transpire. It can knock you down lower or send you up higher. It’s all that really matters, and it all comes down to the fire.
The fire is my servant, at my command, but also the master, with an unyielding hand. It’s fruitless to fight when it makes its demand, conjures the magic and burns in its brand. Sometimes it seems like the kiln gods conspire to alter the plan and deny the desire. It can make your heart break, but also inspire. It’s all that really matters, and it all comes down to the fire.
The dance of the fire can never be tame, one step from the edge on rocky terrain. Once the clay’s been touched it’s never the same, with a sacred stigmata born of the flame. Ashes to ashes, it’s the sanctifier, dust to dust, it’s the purifier. Transformation complete as the flames burn higher, it’s all that really matters, and it all comes down to the fire.
|
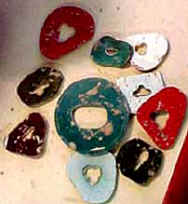
Creative Use of Hand Extruders
The hand extruder has been a common piece of
equipment in college ceramics studios and potter's workshops for decades, but it is still
rare to see this tool used extensively or creatively. Many students and potters never
attempt anything more challenging than the ubiquitous extruded mug handle. Others are
"turned off" of extruders because they have seen one too many of those extruded
handles that were created solely because an extruder can make a lot of handles quickly. |
 |
A major
stifling influence for creative extruder use is the ready availability of pre-made
extruder dies. Every company that offers an extruder for sale also offers all sorts of
"one-size-fits-all" dies. This is unfortunate because a lot of the creative
input when using an extruder is in designing the dies. It's also a shame because most hand
extruder dies are quick and easy to make with just a few hand tools. In fact, the extruder
itself is an extremely simple piece of equipment; it consists of a tube with a die at one
end and a plunger at the other end, and any handy person could make their own. Designing a
die requires thinking "from a different perspective", because it is the negative
space of the die that is important. Also, a two dimensional (for practical purposes) die
must be designed to produce a three dimensional piece. This shift in thinking becomes
natural with some experience in designing and making dies. |
 |
When I use the
extruder, in most cases I do not want the finished product to "look" extruded.
Clay right out of the extruder has a hard-edged, tooled look, and a twist, or turn, or
distortion can soften that extruded look and make it more expressive. A sign of success,
for me, is when another potter sees something I've made using the extruder and can't
figure out how it was made. Producing pots by extrusion is one of those things that sounds
like it will enable one to make dozens of items in a short time. Of course, compared to a
skilled potter at the potter's wheel, just the opposite is true. Because of all the
measuring, cutting, and joining, an extruded pot requires more time to make than a similar
thrown pot. |
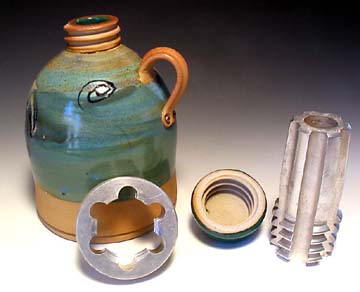 |
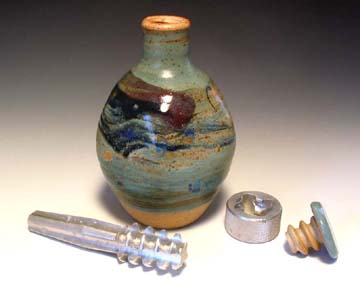
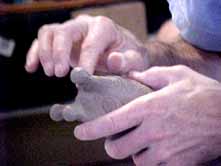
Screw-on Lids I have been interested in making pottery with locking lids for many years. In fact, my college thesis from 1976 was titled “Ceramic Storage Containers Emphasizing Locking and Sealing Lids”. In the thesis, I searched for references that described different methods for making locking lids, and then developed my own guidelines for production for the modern studio potter. The oldest reference I could find, by the way, was instructions for making a bottle with a screw-on lid in the book “The Three Books of the Potter’s Art”, by Cipriano Piccolpasso, which was written in the 16th century. |
|
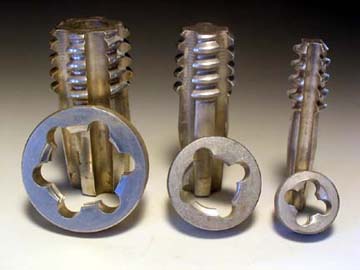
Today, to make my bottles and jugs with screw-on lids, I use aluminum potter’s taps and dies. I have a set of three sizes that was made by the Bluebird Pottery Equipment company in the late 1970’s. They have not been made in more than 35 years and not many were made at the time, so these tap and die sets are very rare and almost impossible to find. Since production was so limited, they were really hand-made and quite expensive for a college student in the '70's, so I did not own a set myself until about 25 years ago. I got them from potter Ric Swenson, when he generously offered to sell me his set since he didn’t use them and I was anxious to have them put to good use. |
|
|
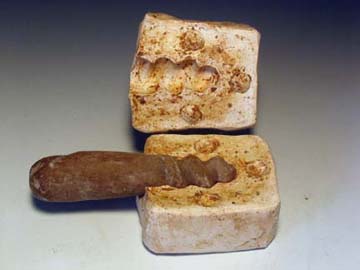
Before I got the potter’s tap and die sets, I made bottles with screw-in stoppers with tools I had made myself out of clay and plaster. The instructions for making and using these tools are covered in the thesis. Basically, a bottle is threaded with a large clay hand-formed screw, and the matching stopper is formed in a plaster press mold that was made from the clay screw. |
|
|
|
|
A few years ago, my friend Andi Fasimpaur scanned my thesis and programmed it into Adobe Acrobat format. If you would like to read it, send an enquiry and I can e-mail it as an attachment (no charge) or for $5 I can mail it to you on a CD. |
 |
|
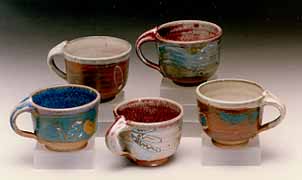
Functional Pots Should Function Well |
| In the world of ceramics, there are few things more annoying than a supposedly functional pot that doesn’t function well. I call these pots “pseudo-functional”. I know that “vessel forms” that “suggest function” have been all the rage in the art pottery world in recent years, but it’s a trend I was never interested in pursuing. When a pottery piece implies function but doesn’t work well, the owner finds out it is actually “less” than they first thought it to be. The cynic would say that this seems to be the standard model for most businesses today: the goal is to produce a product that seems like more than it really is, in order to close the sale. My goal, in making functional pottery, is just the opposite. I want my pottery to reveal itself slowly over time and, with use, make itself more valuable by giving pleasure to the user. |
 |
| In Ceramics, “Handmade” Still Means “Hand”
Made
What exactly does it mean to call a piece of pottery handmade? At first glance, it might seem obvious;
it’s either handmade or it isn’t. Well, in taking a look around craft shows and
talking to potters, I’ve found that the definition of “handmade” mostly
depends on who is doing the talking. Of course any potter you talk to at a craft show
considers their work handmade; what they consider not handmade is any work that uses more
advanced or automated technologies than they use. |
 |
This
has probably gone on for millennia. The potters in ancient Egypt were probably pretty
hacked off when some guy built the first potter’s wheel and started turning out pots
ten times faster than the handbuilders. They probably considered these pots “machine
made” and less valuable than their truly handmade pots. Thousands of years later, the
wheel-throwing potters were probably none too happy when some mechanical wizard figured
out a way to make a motor turn his wheel, and was able to increase production while doing
less work. “Not really handmade,” they probably argued, because a machine was
taking over what the potter used to do. Of course, it wasn’t long before someone else
added an arm and a mold head to the motor-driven wheel, and the jiggering wheel came into
being. The throwers argued, I’m sure, that their work was far superior because it
took more skill to make each piece without a jigger mold and it was thus
“authentically handmade”. Recently a potter friend came by to visit and showed me one of his mugs. It had been slip-cast in a mold. The mold was made from a wheel-thrown cup with a pulled handle, and, I’ll tell you, that mug sure looked hand-thrown with a pulled handle, right down to the finger wipes that attached the lower end of the handle. Since I had this “What is handmade?” question on my mind, I asked him if he considers his mugs handmade. Well, he does, and he started telling me about all the time and effort required to cast the mug, clean up the mold lines, glaze and decorate it, and fire and finish it.
|
|
There are other criteria that
are useful for judging a piece of pottery as handmade or not. One is to question how much
skill, or training, was required to make the piece. Workers in ceramics factories can be
trained in a few days to pour molds or press pottery. On the other hand, learning to
skillfully manipulate plastic clay into desired shapes takes years of practice. Yes, I
know that great skill and experience was required to make that mold. Well, the mold itself
is handmade. Another useful question is, “What would be involved if the design of the
piece were changed slightly, say made a half inch wider?” For mass produced pottery
this would require a complete retooling, while for a potter shaping plastic clay by hand
it would simply mean that she would start with a little more clay and remember to make the
form a little wider. It is this quick and easy evolution of form that allows an
accomplished potter to grow and to breathe life into her continuously refined work. |
 |
Like so many terms used in
business and government, and indicative of the times, the word “handmade”, as
applied to pottery, has been ever more broadly and inclusively used. This makes the word
meaningless at best, and downright misleading at worst. I say it’s time buck the
trend of the 90’s and narrowly define the word. “Handmade” means shaped
with the hands, period. Jiggered work is not handmade, pressed work is not handmade, and
slip cast work is not handmade, no matter how well designed and well made. The exception
would be in the case where pressed or cast pieces are twisted, cut apart, or re-assembled,
in which case they are really being used as building components. |
| So, what about that slip-cast platter that has been so elegantly and meticulously decorated with hours of hand labor? It’s certainly not mass produced or the product of a factory assembly line. Well, it can most definitely be labeled as “limited production”, “individually hand-finished”, or “hand painted”, but, sorry, it’s still not “handmade”. |
The Wreck of '85 I needed to re-build and repair my kiln, so I
started out one Saturday looking for the 150 or so bricks required for the project. I
already had all the insulating firebricks I needed, but I needed some hard firebricks for
the foundation and the fireboxes. Calls to a couple of friends with known
"brick stashes" didn't The (kiln) gods were smiling on me.
I
first found out about the firebrick factory in Troup, Texas years ago because I noticed,
when driving through town, that many houses had firebrick walkways and flower bed borders.
Firebricks are used to build fireplaces and kilns, and are much more expensive than common
house bricks, so this was unusual. I found out that the bricks were made in town, and the
ones used for walkways and such were rejects from the factory. |
| The kiln used to manufacture the bricks was huge, about 20 feet wide and almost as long as a football field, and it made quite an impression on me when I saw it years ago. Imagine my shock when I saw it again and it was reduced to a pile of rubble. It seems that there was a "wreck" in 1985. One of the carloads of firebricks ran off the tracks in the kiln and knocked down part of the kiln wall. Everything was shut down and production was stopped. The result was thousands of bricks at every stage of production: wet bricks, dried bricks, half-fired bricks, almost- finished bricks, and finished, but "wrecked" bricks. Since the kiln was forty years old, and not very efficient by more modern standards, it was never repaired or started again. |
 |
|
The firebrick factory had gone
through some corporate buying and selling and it finally ended up closed down and in the
hands of two local Troup guys. Their main objective was to salvage all the steel they
could from the facility, so |
 |
At 10 cents a brick, of course, any thought of
stopping at the 150 bricks I needed |
|
Of course, there has to be clay at a firebrick
factory, so I asked |
|
Made
in Maydelle, Sold in Maydelle Most of my pottery never leaves Old Farmhouse Pottery until the new owner carries it away. For the last twelve years I have worked at developing sales at my shop, and it has paid off. Of course, there are negative aspects to any methods a potter may try to sell his work. For instance, I am more than occasionally interrupted during the lunch hour by people wanting to shop. But selling directly to interested and enthusiastic customers right at my studio is more gratifying, both economically and emotionally than sending boxes of work to a store or gallery and never meeting the final buyer. As for art fairs, it only takes sitting through a few weekends of rain and no sales to appreciate the benefits of making a living without leaving home. I still wholesale some work to a few shops and set up a display at a couple of art fairs each year, and even sell a few pieces through the web site, but selling directly to the final buyer at my shop, right next to my house, accounts for most of my pottery sales, and I like it that way. |
 |
The “Three E’s” of Making Tools Presented at “Tool Doctors”, NCECA Conference 2000 |
 |
In recent years, I have noticed an accelerating pace in the introduction of new tools, equipment, and accessories offered for sale to people working with clay. This is not a bad trend; in fact, it’s a healthy sign of interest and activity in the field. But, I can’t help but wonder if there is work being produced that is unduly influenced by the standardized tools that were used to make it, and if a certain way of thinking is on the decline because the artist does not give as much thought to the design and use of tools. |
| So, why should you make your own tools? Well, there are three reasons, that I call the “Three E’s” of homemade tools: Economy, Education, and Expression. All do-it-yourself projects include, in varying proportion, each of these three elements. At first thought, economy may seem like the primary benefit of making your own. In fact, it is often the least important, and sometimes almost absent. For example, when I show visitors to my shop my wood fired kiln, they often start talking about how much money I must be saving by not paying for electricity or gas. Uh…well, yes, if you don’t count a day away from other work to retrieve and stack the wood, a day to stoke the fire, and a half-day to clean the kiln furniture after each firing. I try to show the visitors how the wood-fired kiln is a tool for enhancing the personal expression in my work, not an economy measure. |
| There are, however, many homemade tools that do effectively save money, and we all know that many potters and art departments have more time than money. When taking educational and creative aspects into account, the time spent making a tool or piece of equipment can be time well spent. Hardly a day in the ceramics shop goes by that I don’t use a homemade tool that I consider better, or at least better suited to the way I work, than what is offered for sale. For example, I hate batt pins, so I don’t use them. My batts, which have served me well for more than twenty years, are Formica sink cutouts, retrieved from a cabinet shop. They are held on the wheelhead by three 1” X 2” cleats screwed on the bottoms. No matching up the holes to the pins, no enlarged oval holes that won’t hold tight, no knife to pry the batts off the wheelhead, and the wheelhead is still easily accessible when a batt is not needed. I think my system is better than anything you can buy, and the cost was next to nothing. My kiln posts were extruded using a claybody of half old crushed insulating firebricks and half fireclay, for a cost of pennies per post. They are as good as commercially available posts, but I make them even better by rolling them, just after extruding and cutting to length, in a pan of alumina hydrate. This thick embedded coating makes them hold up better to the ravages of ashes flying around in my wood-fired kiln. Further, I stamp the length measurement of the post on all four sides, so I can tell at a glance a six-inch post from a seven-inch. Better than anything I could buy. |
 |
 |
Another avenue for individualizing extruded work is by designing and making what I call “post-extruding tools”. These are various jigs or forms that are designed to alter or add to a newly extruded shape. They can be made to work with an existing extruder die, or a die can be designed and made to fit the post-extruding tool. Recently, I’ve been working with wood moldings to alter or add to fresh extrusions. |
|
|
|
|
|
|
|
|
|
|